Serra Tiy
Nicolás de Juan
Musiness
Medio dedicado a la actualidad de la industria de la música

El periódico de Roberto
Medio dedicado a la actualidad de la industria de la música

The RansomHouse cybercriminal group has acknowledged that it is behind the attack and has posted a 4.5 terabyte file of patient and worker information.
We have a new addition to our list!» With this sentence, the group of cybercriminals RansomHouse has announced through its Telegram channel the publication of part of the data it stole from the Hospital Clínic de Barcelona, which includes personal information of both patients and workers, as well as internal documents of all kinds. Specifically, they claim to have a file of 4.4 terabytes, for which they ask for a ransom of 4.5 million dollars. For now, all these records are visible to everyone the world through a link.To access, yes, it is necessary to enter the darkweb, so it does not work in conventional browsers and routers.
Until now, RansomHouse had not publicly claimed responsibility for the attack, which had raised suspicions about whether they were really behind the operation, which was what the hospital officials had claimed. As this newspaper has been able to verify, in the data packages you can find full reports of experimental treatments for cancer patients, electrocardiogram tests or contracts for new hospital employees, among others.
This organization would have already contacted the hospital to demand the ransom, something to which they would have refused. In Spain, the Penal Code directly prohibits favoring the «foundation, organization or activity» of criminal gangs through their «economic cooperation». However, independent consultants and insurers offer these services unofficially to avoid problems. «No company will admit to having paid a ransom, but the truth is that they do it almost every day,» a cybersecurity specialist commented anonymously at the time.
«You are scum of the worst kind. I do not understand how you can publish health data and information about workers who have given their lives during the pandemic to save others, and who give everything every day to maintain the health of the population,» he has It has been the only response that the group has had on its Telegram channel. In this sense, it also made them ugly that the publication of patient data could harm them in their day-to-day lives, since, «for the simple fact of having suffered from cancer, they could be denied mortgages and similar consequences.» «You are nothing more than soulless terrorists. I do not understand how you can sleep at night,» the message settled.
Once they have obtained the data, the ransomware’s modus operandi consists of negotiating a payment to recover from the cyberattack. In the event that the victim does not pay, that information used to remain encrypted (and inaccessible), an operation that has changed in the last year to add an additional form of extortion and that would have been assumed by RansomHouse. Thus, now the attackers take the opportunity to try to sell that data and, if they do not succeed, they publish it on their own website, an additional form of extortion.
The Hospital of Torrejón, in Madrid, has been involved in a «computer incident» since january the 17th, which, as they report from the center, «has affected the availability of some information systems.»
This Hospital mostly belongs to Centene Corporation, company based in Missouri (United States) wich is also a 50% shareholder of Ribera Salud Company , Valencian Health Service concessionaire.

This incidence is, according to hospital sources, a computer virus that has blocked the systems to the point of closing access to patient’s medical records and forcing professionals to make paper medical reports with a tracing to recover that information when it returns to normal.
This computer incident affects the availability of some applications of the center and that the internal computer equipment of the center.
The ransomware that has affected consulting companies as Everys, SER radio network and Jerez City Hall in Spain is called Ryuk and comes from Russia. This malware can encrypt databases, spread on its own and attack business environments. The aim of the creators and broadcasters of this virus is to extorting victims with the release of their computers to obtain a ransom payment of bitcoins.
Ryuk’s modus operandi is very similar to other ransomware, as it can be disseminated thanks to Trojans hidden in emails. Likewise, a new version of malware can spread by itself using the private networks of companies. To do this, it has a file known as Wake on LAN (WoL) that allows the cyber criminals to activate computers if they receive a remote order, expanding in a faster and quieter way.
If this information is confirmed, it would be the first known computer attack on a health center in Spain.
On november the 20th as a result of having run out of machine in the middle of a storm in the anchorage of Ares, the Blue Star was dragged by the wind drifting, until it ended up embarking in the area of Miranda island.
The ship was finally disembarked in december the 10th taking advantage of high tides.

 |

|

|
|
 |
|
|
|
|
|
|
|
|


A Spanish SME, against the Chinese giant ZTE: they bought 48,000 mobile phones and the manufacturer forced them to sell them with great losses.
At the end of 2018, the businessman Yahya Baradi – based in the Villaverde neighborhood, in Madrid – found himself with a huge problem on his hands.
Baradi, whose last name gives name to the company Baradi Distribuciones Mayoristas, had bought 47,800 phones from the Chinese company ZTE that he could not sell. Or he could sell them, but below the price at which he had bought them, which meant losing a lot of money. The reason? ZTE had paralyzed the sale of terminals in Spain and the abusive conditions it imposed on its distributors prevented Baradi from profitably managing this ‘stock’. On the same dates, the manufacturer began to suffer the Trump blockade, which prohibited all American companies from selling components to him.
Baradi, who until then had a good business relationship with ZTE, found himself in a big problem. «We had made a million dollar purchase. Due to a series of circumstances and the international blockade, we had abig deal,» explain Baradi and Pedro Maroto, its chief financial officer. «We had these phones that could not be sold, because any official distribution sale has to be supported by the manufacturer. In the end, since we did not reach an agreement, we had to file a lawsuit because that way of working was not legal.
The company had to undersell the phones, ask for refinancing from the banks to survive and fire five workers. «We had a very large ‘stock’ and no support on their part to sell it,» they say. «They try to sink us.» Now, they are claiming five million from the Spanish subsidiary of ZTE for unfair competition. The lawsuit has been admitted for processing. Winning it would do a good break in the accounts of ZTE Spain, whose business has fallen 40% in the last year, going from billing 66 to 37 million euros and giving losses of 1.7 million in 2018.

The conditions of the Chinese giant ZTE
ZTE is a Shenzhen-based mobile phone provider in China. Their phones are mid-range – between 200 and 400 euros – although they also have some high and low ranges. Baradi has been distributing them in Spain since 2015, accepting their unilateral conditions.
ZTE marked the price to sell the phones to Baradi and the price at which Baradi could sell them to the store, which was lower. Subsequently, ZTE made an «adjustment» to pay him the margin and allow him to earn money. Let’s take the example of a mobile that sold for 210 euros in stores. Baradi would have bought it for 192 euros from ZTE and would have sold it at 170 to the store. Only after fulfilling certain requirements, Baradi could recover those 22 euros through a liquidation. Thus, and according to the lawsuit, «ZTE controlled the entire distribution process and prevented the wholesaler from carrying out commercial operations, since if said operations were not previously authorized, it was liable to lose the return.»
In the last months of 2017, Baradi prepared for the Christmas campaign and bought phones worth almost 8 million euros. It was almost the entire ZTE budget of the year. But once it had them, the Chinese manufacturer systematically denied their sale by not authorizing liquidation. That is: if Baradi decided to sell the phones, he was going to do it losing money, because ZTE was not going to pay him the difference.
Although at first they did not know what it was due to, the Madrid company received the news that Trump prohibited American companies from selling components to ZTE. Also from the reputational crisis of Chinese manufacturers in the United States. Soon after, ZTE informed all its suppliers that it was halting the sale of telephones in Spain. Despite this – and despite the fact that ZTE knew this was going to happen – he did not stop charging Baradi a penny. So the company found itself with almost 48,000 phones that depreciated over time.
«Eventually we sold them to regular distributors», they explain from the company. «ZTE said: if you sell them, there you are. You’re breaking the clauses.» At one point and seeing ZTE’s attitude, Baradi stopped paying him 1.3 million, which ended up costing him one more headache: ZTE declared Sinosure, the Chinese export credit and surety insurer, unpaid, and It blocked its operations with other Chinese manufacturers. «This further aggravated our situation».
«We have been in the sector for 22 years. We have become leaders in other manufacturers. They have supported other companies to sell these terminals. And we had a volume in which we needed them to be able to sell,» conclude those responsible for the firm. After signing a refinancing agreement with the bank that gave them «oxygen,» the owners now hope that the lawsuit will do some good. And if not, at least the ZTE image is damaged.
«They have not helped us at all. They have tried to sink us.»
More information: eldiario.es okdiario.com


You can also book through: Airbnb Trivago


Description from manager
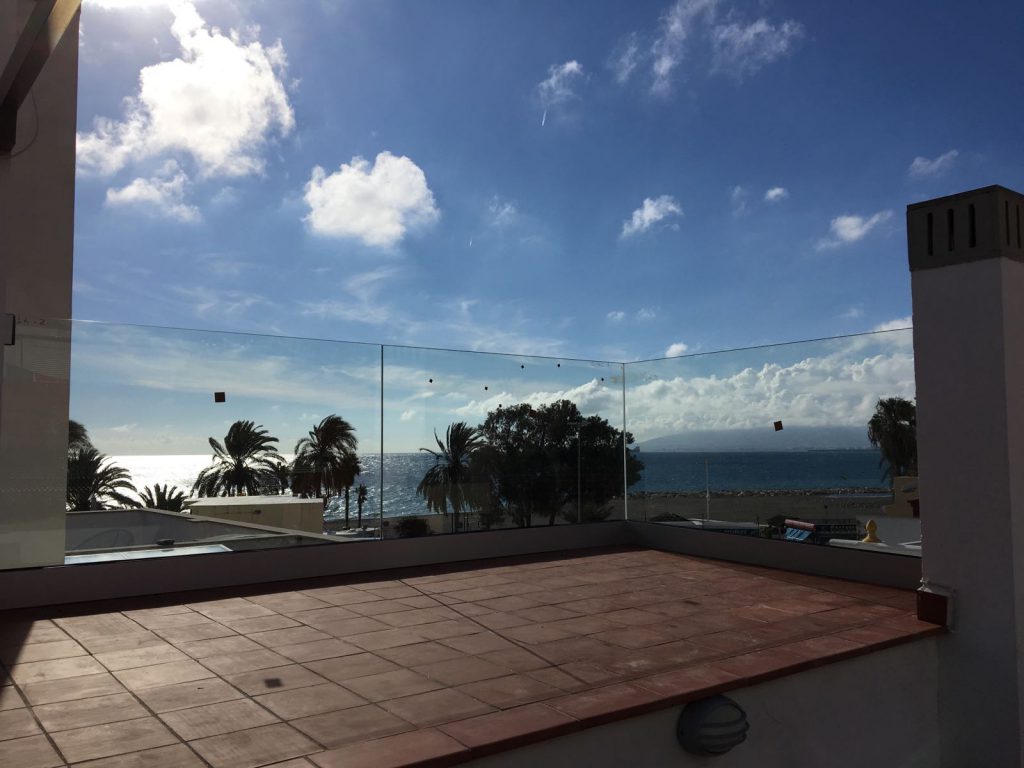
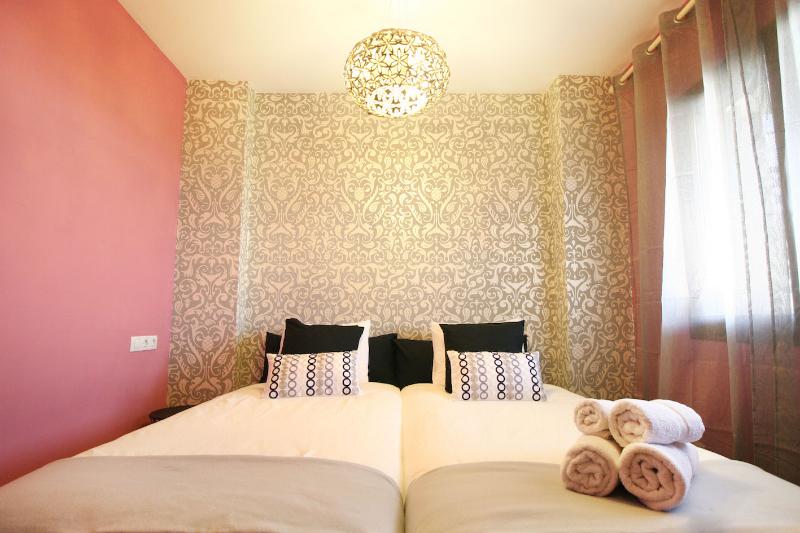
Spacious and stylish living in this first-line beach, 2 bedroom – 1 bathroom apartment; this fabulous and modern apartment with its spectacular Mediterranean views has all that you need for making the best of your self-catering Holiday!
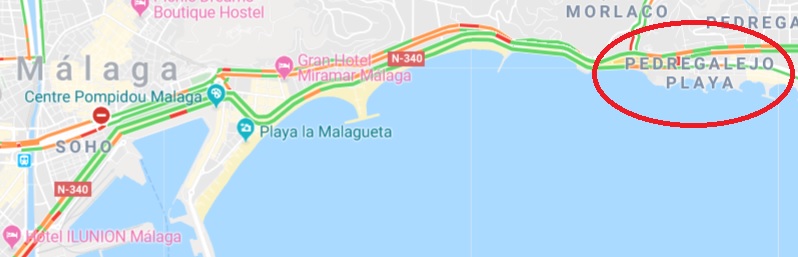
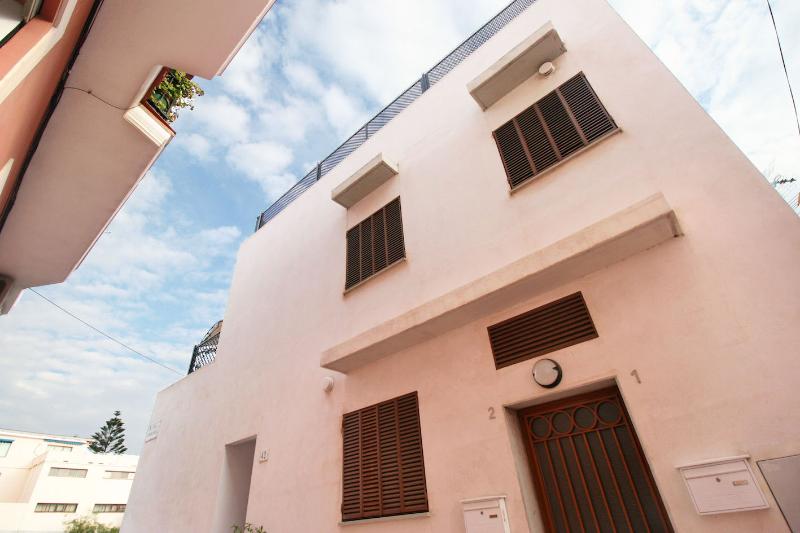
Located in the popular “East Village” of Malaga City (known as Pedregalejo), this new property is only steps away from the best fish restaurant of the city, supermarkets and local bus lines that will leave you in the city’s old quarter in only 15 minutes…and we can not forget we are 4 min walking from the prestigious Cervantes Spanish School.
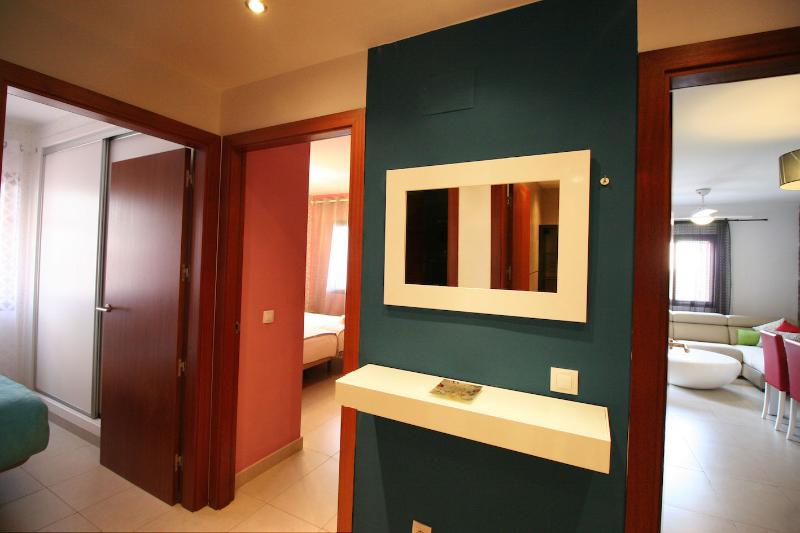
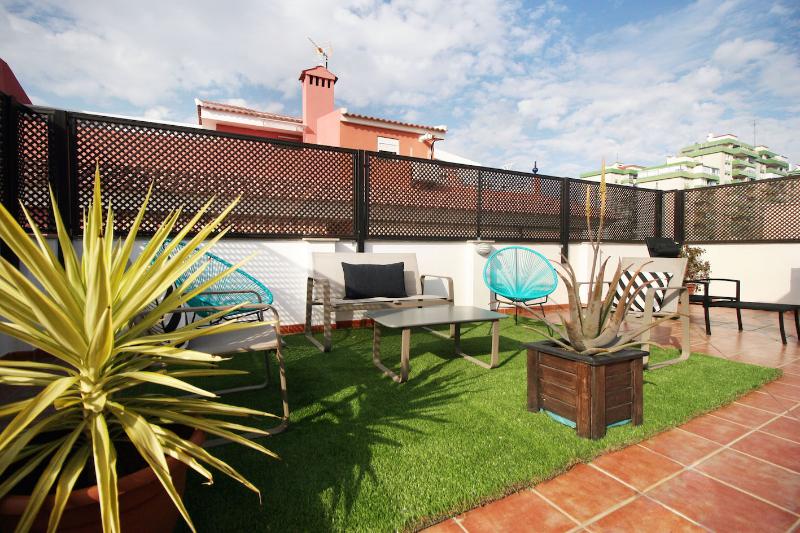
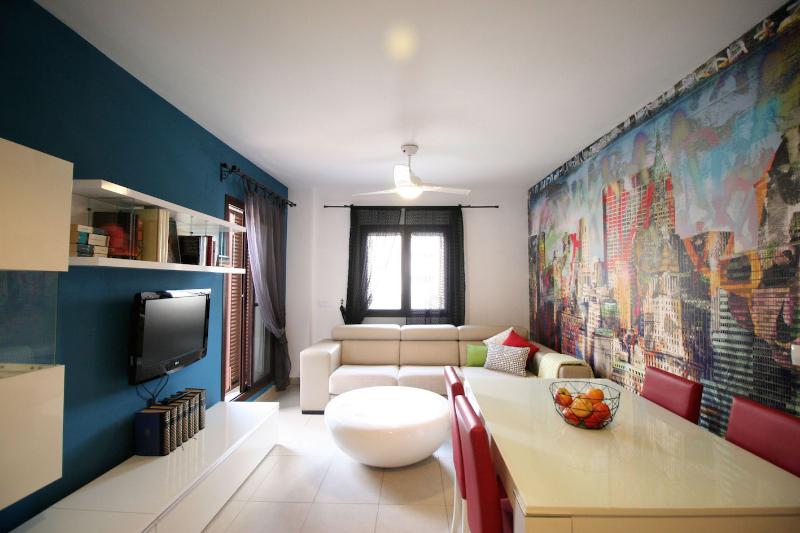
Located on the 1st floor of a walk up building, the 72 sq.m. apartment is completely furnished and equipped for a comfortable and uncomplicated stay: it includes AC / heating unit in each room, contemporary furniture, 2 terraces, elegant living and dining areas. The spacious bathroom features an enclosed shower.
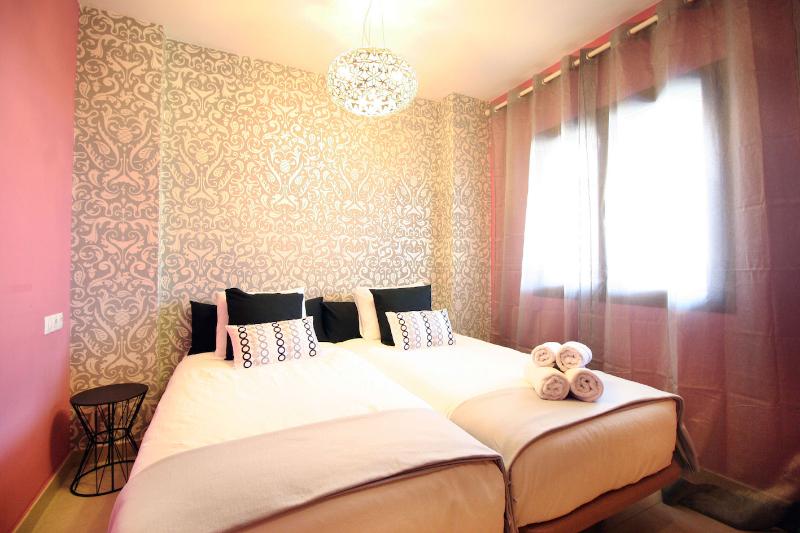
There are 2 bedrooms both with plenty closet space; one of them features a 150 cm. Double bed and the other has 2 single beds of 90 cm.
The kitchen is fully equipped including, electric induction hob, microwave, oven, washer and dryer, toaster, kettle, among others.
In the living room you will find a 32” flat-screen TV, WiFi, a dining table for 4 (expandable) as well as a small covered terrace in the same floor: the perfect place for having your romantic out-door lunch/dinner or to enjoy the warmth of our 320 days of sunshine.
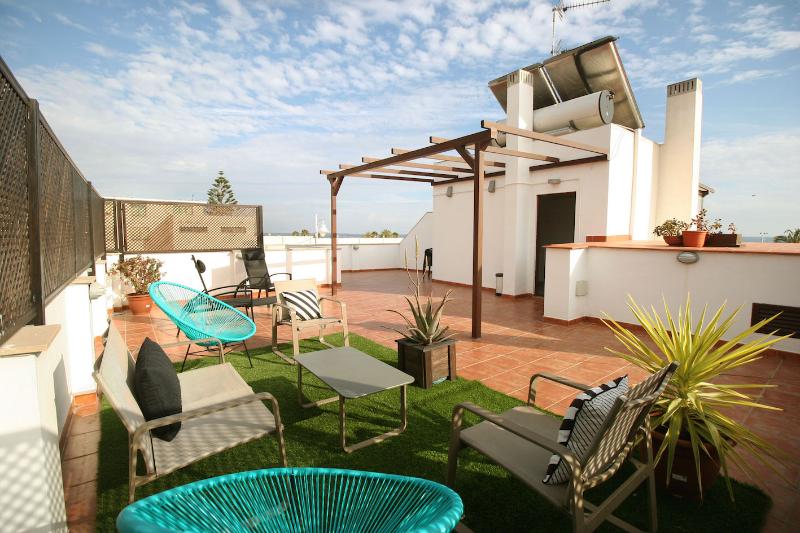
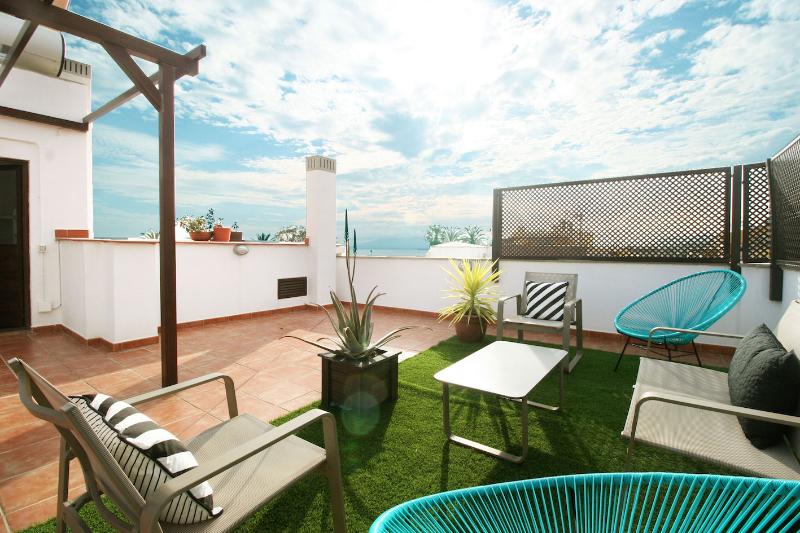
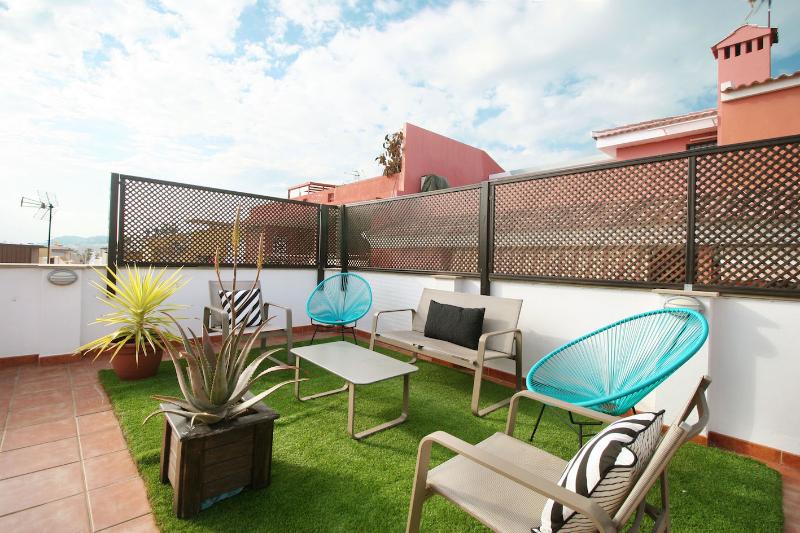
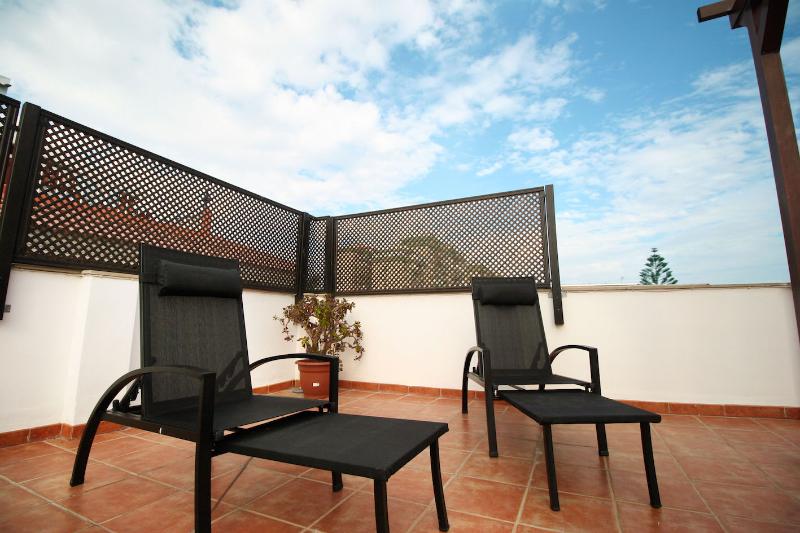
Additionally, the property includes an amazing 70 sq.m. private solarium (accessible from the living room by a spiral staircase) which is perfect to chill! Prepare yourself an ice-cool drink before laying back in the sunshine on one of the sun loungers. (NO BBQS allowed)
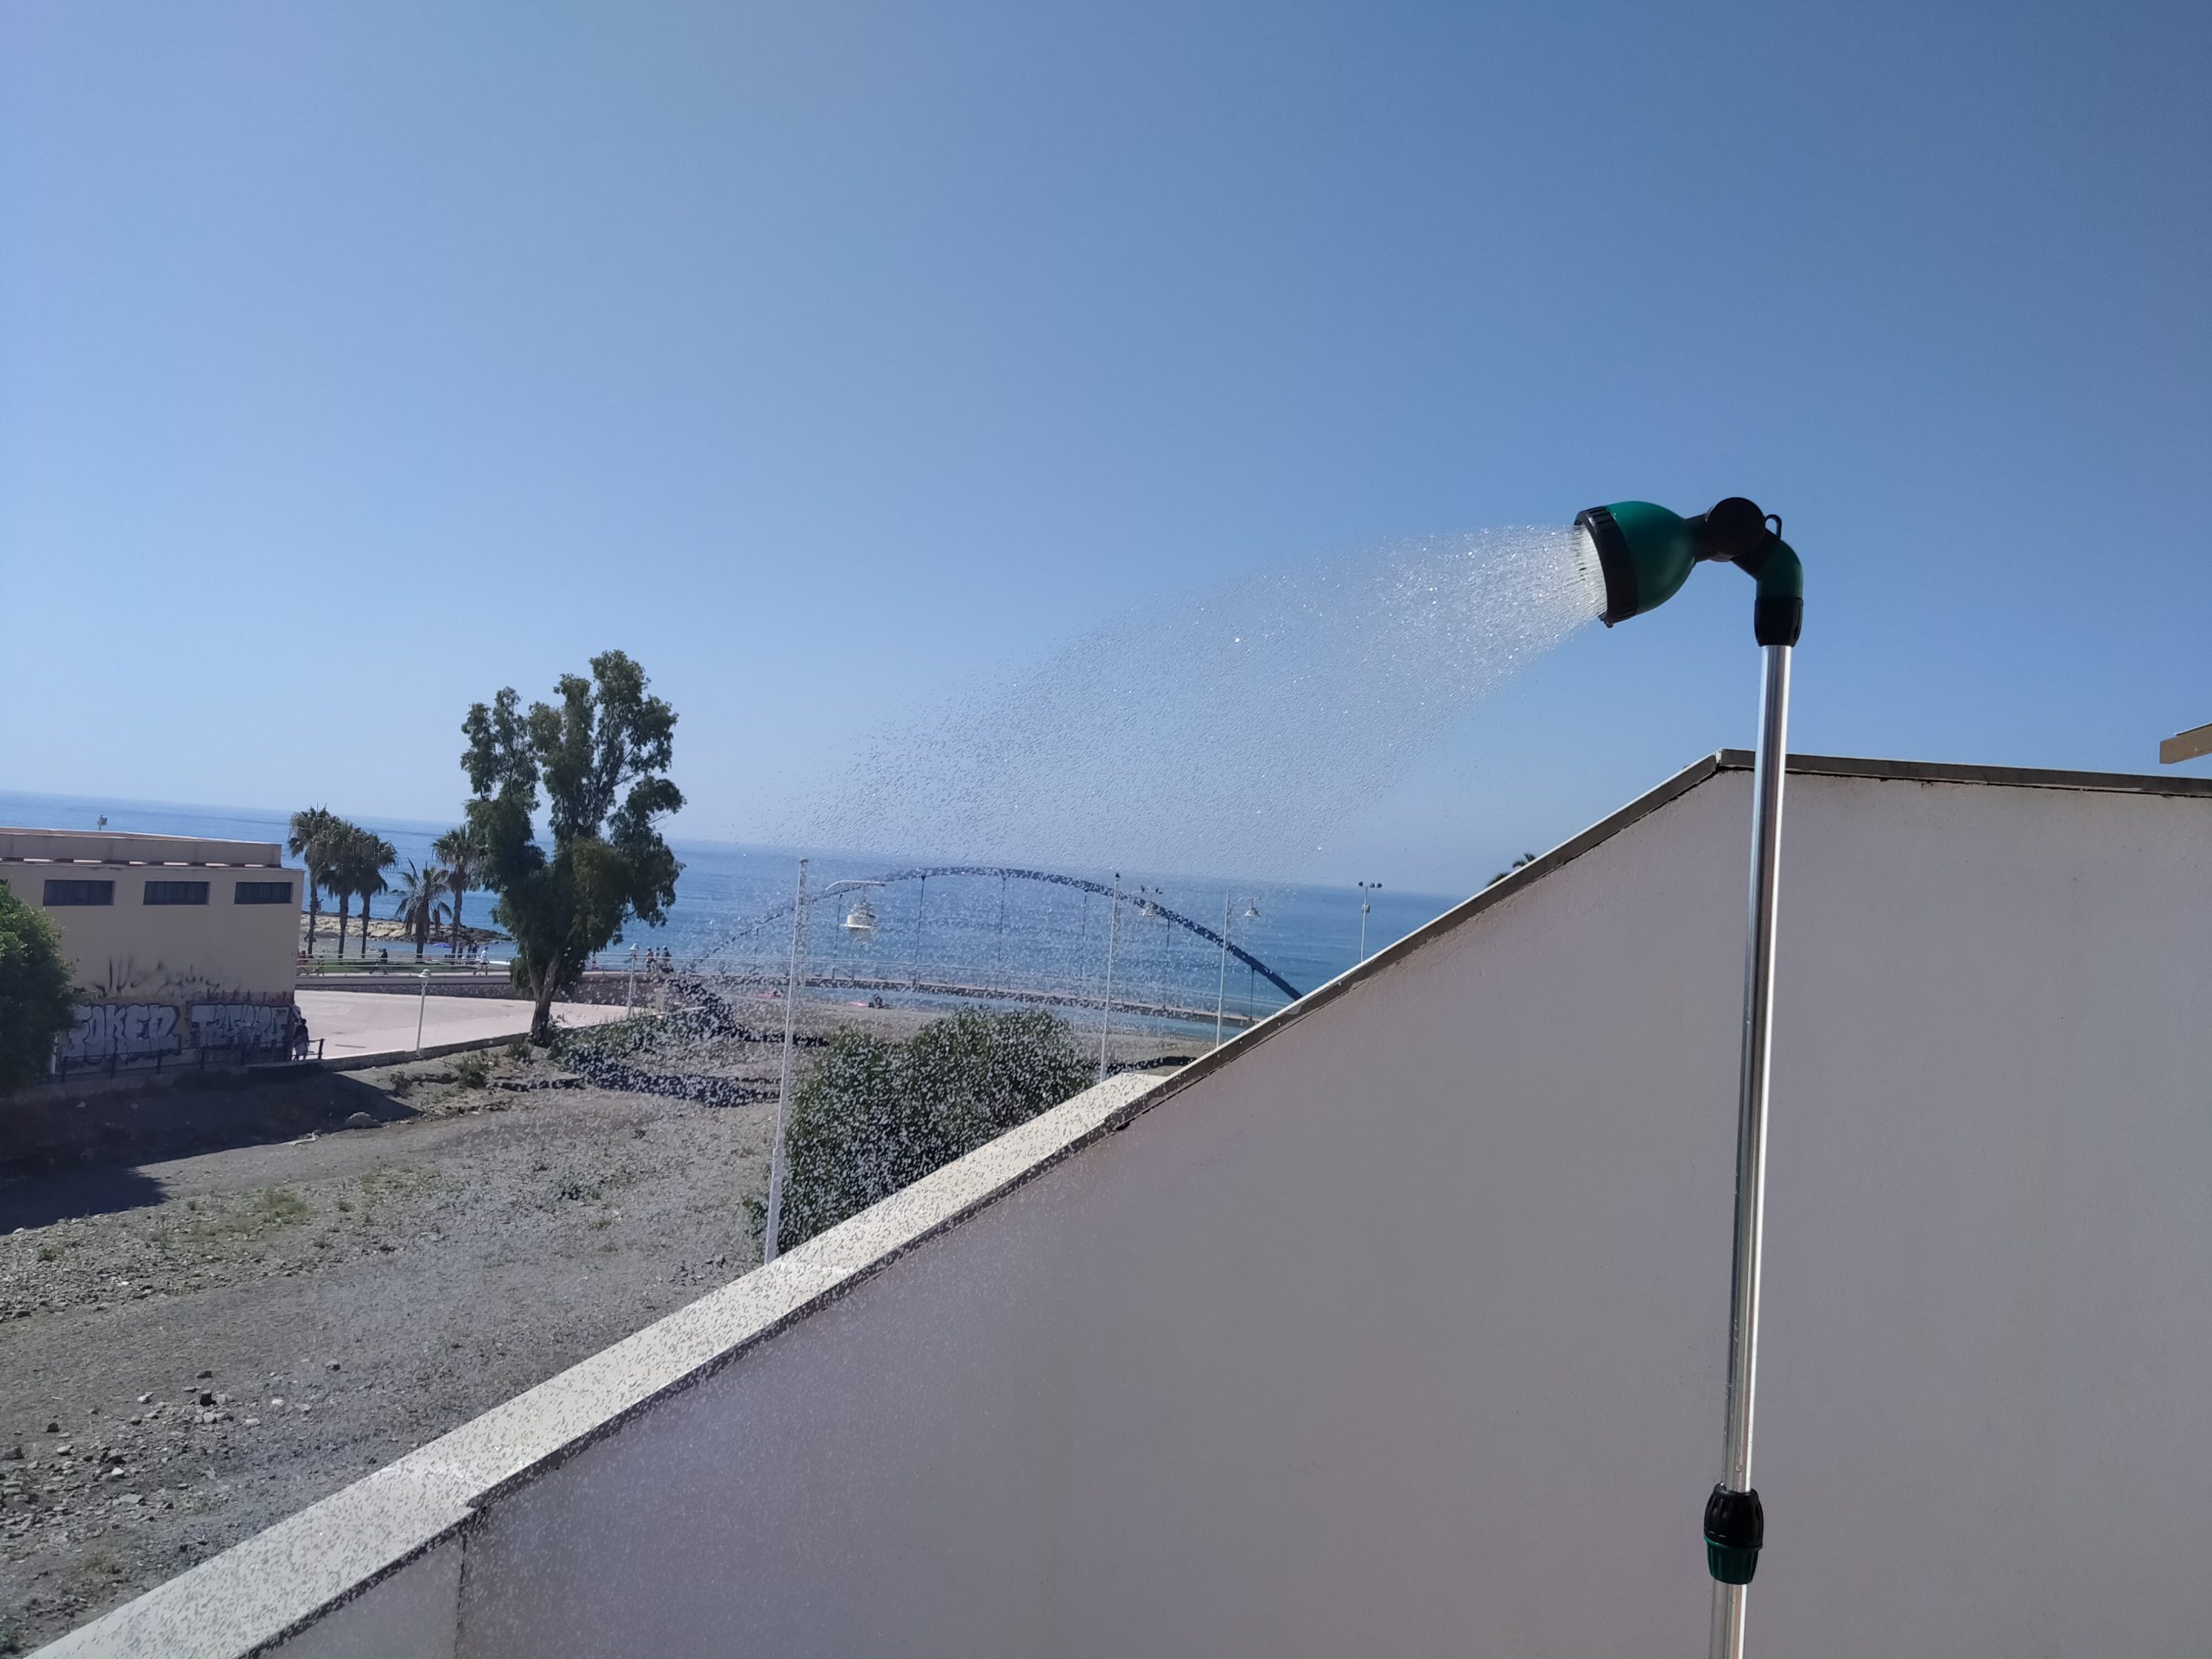
Pedregalejo is famous for its seaside promenade, filled with a charming and unique atmosphere. Traditionally known as Pedregalejo Beach, this is the old Eastern fishing district of Malaga city, located between the “Baños del Carmen” & the “Arroyo Jaboneros”.
The quarter was characterized by hosting some of the summer residences of Malaga’s bourgeoisie in the 19th & early 20th century, featuring beautiful houses and villas and nowadays also very popular to academies and schools of Spanish for foreigners, as well as restaurants, supermarkets, shops and anything you might need during your stay.
Communication with any point of Malaga is very comfortable, because there is Public Transportation about 1 minute walking from the apartment, with several bus lines and expressways in all directions.
VERY IMPORTANT: LOCAL POLICE REQUIRES US TO HAVE ALL YOUR IDENTIFICATION INFORMATION SO PLEASE SEND A COPY/PHOTO OF YOUR PASSPORT OR ID PRIOR TO ARRIVAL (ALSO YOU CAN SHOW THEM IN THE CHECK IN) as we need to provide this information.
Parking on the streets in the winter time is usually easy (except in on the weekends maybe) but in the summer it is next to impossible.
SPECIAL SEASON MINIMUM NUMBER OF GUESTS: Christmas, Holy Week and Feria de Malaga require a minimum of 3 guests.
Bedclothes and linens included in the rental Price. Baby-bed lines also available without charges(baby cot does have a charge). At your arrival you will find the beds made. We change the bedclothes on demand (with charges).
One set of towels (One big and one small towel) per Person is included in the rental Price. We Change the towel-sets on demand (with charges). BATH TOWELS CANNOT BE USED FOR THE BEACH! We will check them at your departure and if necessary deduct the charge from the security deposit so please bear that in mind.
IMPORTANT – No refunds will be issued over neighborhood activities(local celebrations), construction work, parties or loud noises caused by non guests or properties (should this happen pease let us know so we can call the police ourselves), street noise, no street parking or road closures. If we are made aware of such an event in advance, you will be contacted as soon as possible. We are not responsible for those activities.
Rising Tides is probably one of the best sports Addon for Kodi, specially for live events.
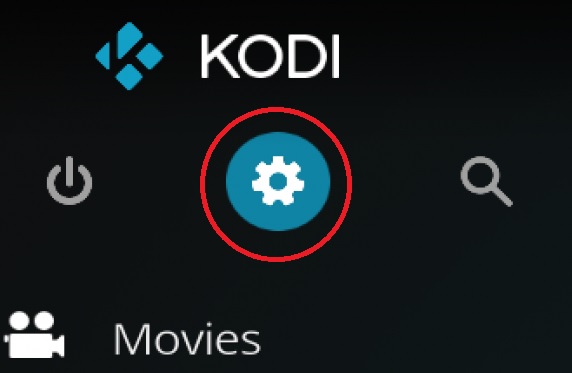
To install it just go to System in the Kodi main menu
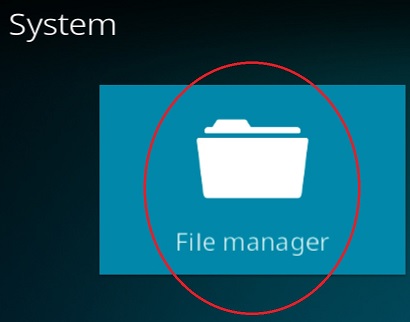
then select File manager
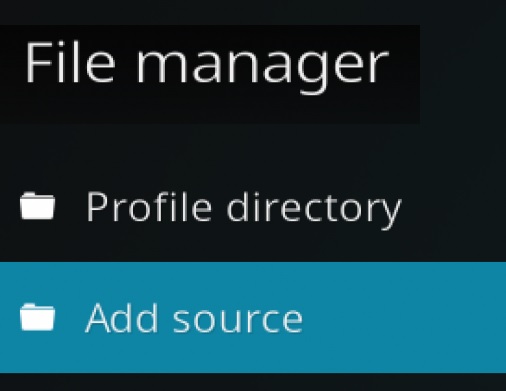
Now click on add source
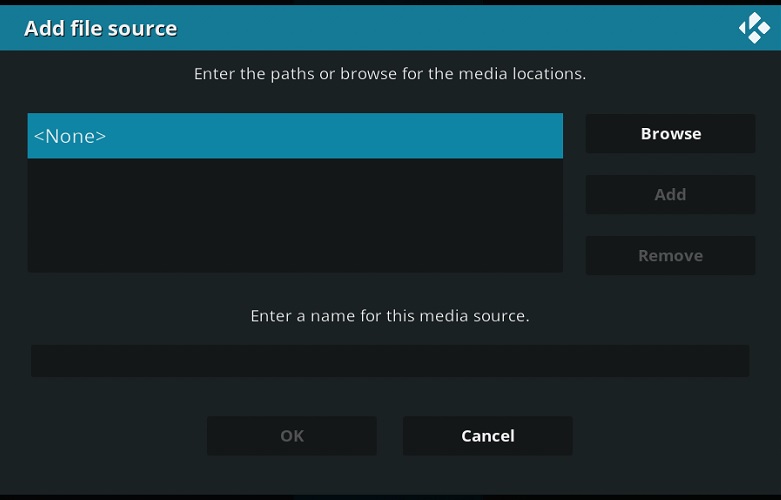
Click on <None> and type
http://mullafabz.xyz/Repository/K19/
and then select Done
Then type a name for this media source, for example mullafabz
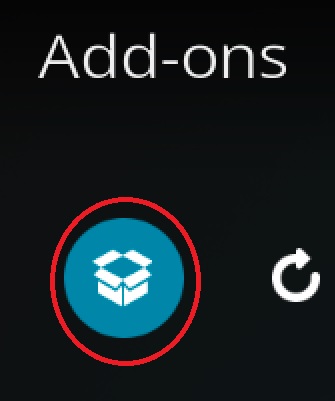
Now go back to Add-ons and click on the box
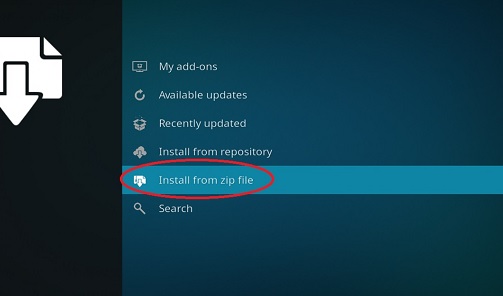
Click Install from zip file
Then choose mullafabz, then repository.Rising.Tides-x.x.zip
Now choose Install from repository , Narcacist’s Wizard Repository, an then choose Video-addons and finally choose Rising Tides.
Now wait for the repository to be installed untill the Rising Tides icon appear in the top right corner.
Torque Lite is now installed, enjoy the best sports live events.
Torque Lite is a one of the best motor sports Addon for Kodi, specially for live events.
To install it just go to System in the Kodi main menu
then select File manager
Now click on add source
Click on <None> and type
https://mylostsoulspace.co.uk/repo/
and then select Done
Then type a name for this media source, for example narcacist
Now go back to Add-ons and click on the box
Click Install from zip file
Then choose narcacist, then repository.NarcacistWizard.zip
Now choose Install from repository , Narcacist’s Wizard Repository, an then choose Video-addons and finally choose Torque Lite.
Now wait for the repository to be installed untill the Torque Lite icon appear in the top right corner.
Torque Lite is now installed, enjoy the best motor sports live events.
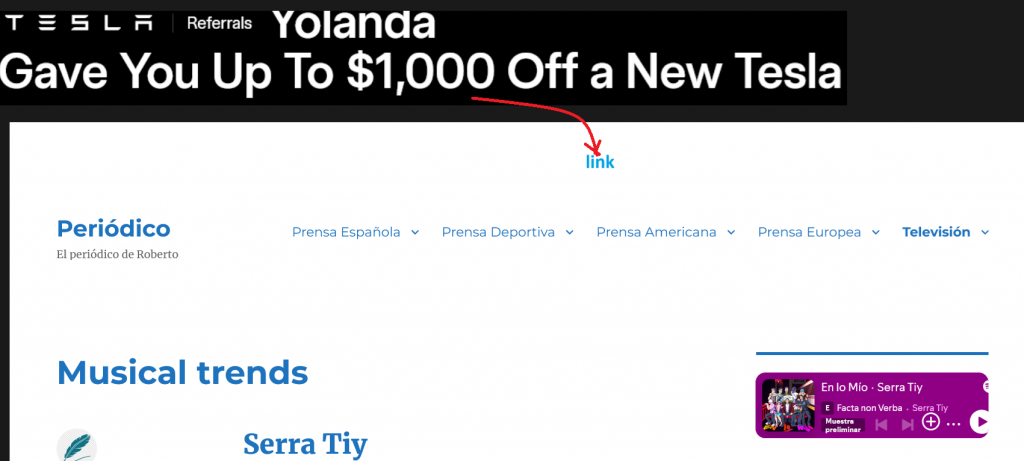
If we need to include an image in the header of our page with a link in WordPress (for example, to include a sponsor’s logo to access the sponsor’s website from there) this is not easy from WordPress. We can include an image but we cannot customize the link associated with this image. In any case, the way to do it is simple, just include a line of code in the header.php of the theme we are using.
For example, if we use the twentysixteen theme, we edit the header.php of this theme that is located in htdocs/wordpress/wp-content/themes/twentysixteen/header.php and include in the html <head> the line that contains the path of our image (which we must have logically previously added to the media library) and the path of the link we want to access by clicking on the image :
<a href=’https://www.tesla.com/referral/yolanda914279′ target=’_blank’>
<img src=’wp-content/uploads/2024/10/YReferral.png’></a>
Which would leave us with something like this:
<?php
/**
 * The template for displaying the header
 *
 * Displays all of the head element and everything up until the "site-content" div.
 *
 * @package WordPress
 * @subpackage Twenty_Sixteen
 * @since Twenty Sixteen 1.0
 */

?><!DOCTYPE html>
<html <?php language_attributes(); ?> class="no-js">
<head>
	<meta charset="<?php bloginfo( 'charset' ); ?>">
	<meta name="viewport" content="width=device-width, initial-scale=1">
	<link rel="profile" href="https://gmpg.org/xfn/11">
	<?php if ( is_singular() && pings_open( get_queried_object() ) ) : ?>
	<link rel="pingback" href="<?php echo esc_url( get_bloginfo( 'pingback_url' ) ); ?>">
	<?php endif; ?>
	<?php wp_head(); ?>

	<a href="https://www.tesla.com/referral/yolanda914279" target="_blank">
	<img src="wp-content/uploads/2024/10/YReferral.png"></a>

</head>
With this, the desired banner will appear in the header of our WordPress with our image and the corresponding link.
SportsHD is a one of the best sports Addon for Kodi, specially for live events.
To install it just go to System in the Kodi main menu
then select File manager
Now click on add source
Click on <None> and type
https://bugatsinho.github.io/repo/
and then select Done
Then type a name for this media source, for example bugatsinho
Now go back to Add-ons and click on the box
Click Install from zip file
Then choose bugatsinho, then repository.bugatsinho-x.x.zip
Now choose Install from repository , bugatsinho repository, an then choose Video-addons and finally choose SportsHD.
Now wait for the repository to be installed untill the SportsHD icon appear in the top right corner.
SportsHD is now installed, enjoy the best sports live events.